To complete Level 2 of Altenew Academy’s teacher accreditation program (AECP) I must meet this challenge: Make 4 masculine cards – birthday, love/thinking of you, anniversary, and encouragement (I made two of these); and, make an up-cycled or altered project.
Since these needed to be masculine cards, I chose to use the Chemistry Vases layered stamp set by #Altenew, because my husband is a chemist. He was in college for chemistry when we were dating a long, long time ago, and did research using chemistry in his career, then moved into engineering late in his career.
Birthday card
I stamped the flask onto watercolor paper using clear ink and heat embossed using white powder. I did this two times, to make it thicker. This will act as a barrier to hold my water coloring in the lines.
I pressed Polar Bear ink onto my glass mat, added some water
and painted in the flask with a brush.
I wanted the flask to be on a table, so I had to create a mask to cover the flask before I did. I used masking paper, which is like a label; but a sheet with lightly sticky backing that makes it easily removable. After I cut it out using scissors, I stuck it over the dried flask.
I used a wood plank stamp I had in my supplies for the table using a brown ink of Altenew’s. I followed the same painting process but this time using two ink cubes of Altenew browns.
Then I painted the background with the Vanilla Crème ink. I had to paint the upper part of the flask too since the flask is supposed to look like it is clear glass.
I stamped on the birthday greeting that came with the stamp set, and the flask calibration markings using Jet Black Crisp Dye Ink. After cutting with a rectangular die, I glued it onto a card base I made out of kraft cardstock. I’ll give it to my husband for his birthday coming up in 2 months.
Encouragement Card
I started by embossing kraft cardstock with Altenew’sStarburst embossing folder. I used a dome foam dauber to rub some brown ink lightly over the raised parts to make them show up more.
I created the bubbly paper by mixing some acrylic paint with some water and stirred in a few drops of dish washing liquid. Using a straw, I blew into the liquid, creating colored bubbles, which I scooped out and placed on papers. This was fun! Then, I waited a while for it to dry, anxiously awaiting to see the results. I was pleased. You should try this sometime.
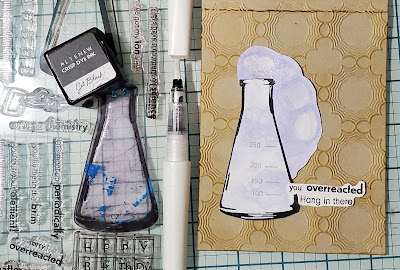
I played around with the flask stamp, laying it in various places on the papers to find the look I wanted. I was wanting the bubbles to look like they were expanding and overflowing out of the flask. I stamped it in black ink, and cut it out with scissors, leaving the overflow part. I glued this onto the embossed card.
I chose the “you overreacted” sentiment from the stamp set, and the “hang in there” sentiment from Blooming Mandalas set. I was thinking this could someday cheer up if he was feeling sad/overwhelmed/upset (over-reacting) about something.
I really hope nothing comes up that he’ll need this card, but as you know, we all will go through some tough times sooner or later.
Love/Thinking of You Card
I used a stencil of hearts that I had made long time ago on my Brother Scan-n-Cut electronic cutting machine. Using Altenew Vanilla Crème mini ink cube and a make-up sponge as a pouncer, I colored in the hearts onto a piece of kraft cardstock. This will be the card front. I did the same inside the card. You may notice in the photo that I also make scoring lines to frame the card front.
I stamped a flask onto white cardstock and cut around it.
Then using a different stencil of various heart shapes, I spread on some decofoil
Transfer Gel DUO by iCraft. After this becomes dry, you can rub foil sheet onto it and
the foils transfers onto wherever the gel was. You can see in the photos that I
did this. Now I have a flask full of love, which I adhered to the card front
with thin foam adhesive.
I stamped on a sentiment from the Chemistry Vases set in Ruby Red ink. I used a die (from Elizabeth Craft) to cut the ribbon shape, and glued it onto the card front. After stamping a pair of reading glasses from Tall Tale set from Altenew, I cut closely around it with scissors. I filled in the lens with Ranger Glossy Accents and adhered it with tiny cuts of foam adhesive.
Now I have a card to give him next Valentine’s Day.
Another Encouragement Card
I just had to try making a flask into a shaker! Many of the sequins inside are hearts.
The be happy stamp is from Altenew’s Engraved Motifs stamps set, using Jet Black ink. Then with clear sticky ink and clear embossing powder. After heating that to melt it, I used the die to cut out this sentiment. The lower sentiment is from the Chemistry Vases set.
I stamped the flask onto an oval I had cut out of white cardstock. I cut out the center of the flask with scissors.
On the back side of that, glued a piece of acetate that I had saved from a package. (I encourage you to save all that kind of stuff. You may find you can use it sometime.) I adhered strips of foam tape around the flask shape; then sprinkled in some Altenew Gold sequins, along with some greens someone had give me. I liked the hearts in the green set and handpicked several of them to use.
I pealed off the paper strips from the foam tape and attached
another oval of white cardstock. Of course, I didn’t get it on absolutely lined
up, so I cut a little off.
Anniversary Card
I started with the base. Using watercolor paper I pressed 2 green ink pads onto my glass surface, added some water and spread this all over the paper with a brush. I set that aside to dry.
Taking a cut half sheet of 8.5x11 inch heavy white
cardstock, I then cut across to measure 4.5 inches by 8.5 inches. I scored at the half way mark, then diagonally
across one square. This will become a
pop-up fold.
I found a scrap of sky paper in my supplies and cut into two triangles to fit and glued them down onto what will be the outside of the card. You could use blue or green.
On another sheet of watercolor paper, I stamped the house from Altenew’s Home Sweet Home stamp set with clear ink. This set had such nice sentiments. I heat embossed it with Altenew’s Platinum powder, twice. I followed the same procedure to watercolor this as I did in the birthday card, and cut around it. On the windows, I brushed on some clear sparkly Wink of Stella, instead of paint.
I cut the green paper to fit the card and glued it down on the inside.
I used a sentiment from this stamp set, but added the happy anniversary stamp I got out of Altenew’s Wishing You set. I this out to be a square and adhered it to the inside at an angle to the corner, using foam tape. It needs the height to hold up the front after the card is opened.
After it was folded up, I could decide where I needed to glue on the house, being careful not to put glue on the part that will extend past the fold.
I then decided that the front needed a little something in the upper right, so I used another stamp from the Home Sweet Home set there.
If you read this far, thank you. I hoped you enjoyed reading my journey in the challenge and picked up a few ideas for yourself. Next is the Up-cycled part of the challenge. Perhaps you’ll get some ideas from that as well.
The Up-cycled Projects Part
I got carried away doing this part!
1. Small
Note Pad
I used some heavy brown paper and some thin, lighter paper that both came wrapping contents in shipments I received. I cut a piece of the dark brown paper to 3.5” x 9”, and folded in half. This will be the cover.
I cut several of the lighter paper into sheets 3” x 8.5”, folded in half, and stacked them. I poked holes at the fold of the dark, an inch from each edge. Using a small hole puncher, I poked holes in the sheets similarly, but at ¾” from edges. With a thread from some burlap I had (you can use a string of jute) I threaded through all and tied a bow on the outside, holding it all together. If you wish, you can first sew stitching across the fold, like I did.
I decided
to add a piece of kraft cardstock cut from a scrap & glued to the inside of
the back cover for strength.
To decorate the cover, I tore up a piece of a cardboard box, exposing the corrugated bumps, then ran a brown ink pad over it to darken some areas. I cut a piece of lace fabric from my sewing stash, (use whatever you want). I added some die-cuts and a bird card from a pack of ephemera. After stamping “all the best” on a leftover piece of cardstock, I trimmed it. I used glue to attach all of the layers except the sentiment, where foam tape is.
Adding a few drops of Liquid Pearls gave a nice tough, I thought.
I’m thinking about making about 25 of these to give to the
ladies in my weekly crafting/stitching group members.
2. Small Journal
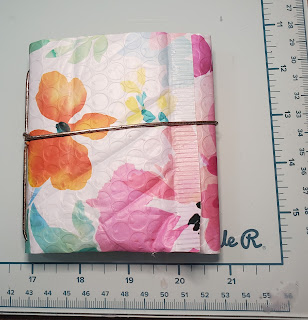
I made a small journal. I cut up a floral padded shipping envelope that I received a shipment from Altenew in. Using the floral envelope, I made a wrap-around cover for a small journal.
I cut across one side of the it so I had the crimped edges at
both ends, about 4”x 10”. (I am sure you know how to measure and cut paper, so I didn't add photos of that part.) I poked two tiny holes at about 3/5” from an end,
each about 1/4 inch from cut edge, and one centered between them.
I used some silvery, stretch cord that I found in my gift-wrapping supplies,which I cut to about 18”. I ran this through the outer holes to hold in the papers at the folds, then a loop out the center hold, knotting it inside the journal.
The cover folds in thirds, but not exact measurements, as shown in short video. Insert the stack so the fold is under the cord inside the journal.
To close the journal, take the right-hand flap,
fold toward the left over top of the papers, folding just before the cover fold
touches the right edge of the papers, covering up the papers. Then bring over
the left side of the cover folding it over top of the right. Bring the cord
around the whole journal to hold it closed.
3. Composition
Book Cover
I used the beautiful gold on black tissue paper that came
with a Craft Your Life kit. I smoothed it out and using matte medium gel and a
brush, applied it to the front and back covers of a composition book. I used a
straight edge to butt up to the black cloth binding, that way I didn’t have to
wrap the tissue around it. It looks so nice.
I am considering using some gold sticker letters to put my name on the
cover.
4 Traveler's Journal Cover


.jpg)
.jpg)

